Why Your Teeth Ache Only When You Take Your Invisalign Out to Eat
I remember the exact moment it hit me—there I was, mid-bite into my favorite crunchy apple, only to be met with a sharp, unexpected jolt of pain as I took my Invisalign out. It was frustrating! One day, my teeth felt perfectly fine, and the next, they ached whenever I removed the aligners to eat. That lightbulb moment made me realize I wasn’t alone in this strange experience, and honestly, it can be pretty worrisome if you don’t understand what’s going on.
Getting to the Root of the Tooth Ache Problem with Invisalign
Many people assume that Invisalign should be comfortable throughout treatment. However, experiencing pain only when removing your aligners is more common than you’d think. This discomfort often arises because your teeth and gums are adapting to the new position caused by the braces, and sometimes, the removal process itself can trigger sensitivity. When the aligners are in place, they gently guide your teeth, but taking them out exposes sensitive areas, especially if your gums are slightly inflamed or receding, making the sensation more noticeable.
The good news? Understanding why this happens is the first step toward relief. Sometimes, this pain is simply a sign that your bones and tissues are adjusting to realignment—that’s normal. But persistent or severe pain might indicate other issues, like gum inflammation or even improper aligner fit. It’s crucial not to ignore these signals.
Believe me, early in my own Invisalign journey, I made the mistake of brushing off mild discomfort. Looking back, that was a mistake. I should have addressed it sooner rather than waiting for it to become a bigger problem. For instance, visiting a trusted family dentist can make all the difference—did you know that regular checkups can catch small issues before they turn into serious pain? You can read more about creating a healthy smile for your family [here](https://smilegumcare.com/family-dentistry-tips-creating-a-healthy-smile-for-your-kids-at-0915).
In the next part of this post, we’ll dive into practical steps you can take to minimize discomfort and keep your Invisalign experience as smooth as possible. Whether it’s tips on proper removal techniques or understanding when to consult your dentist, you’ll find valuable advice to make your journey easier.
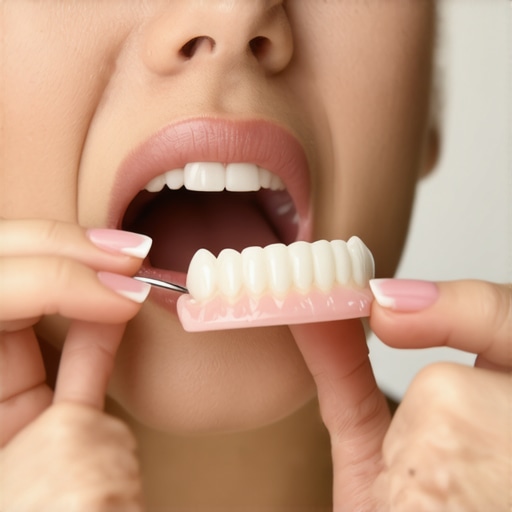
Master the Art of Gentle Removal
Use your fingers, not your nails, to grasp the aligners firmly at the molars, then gently wiggle them back and forth to loosen. I once struggled with jagged removal, causing gum irritation, but switching to a controlled, rocking motion made all the difference, resulting in less pain.
Practice the Right Technique
Aligners are like delicate latches—apply even pressure without forcing. Place your thumbs on the front and index fingers on the sides, then pull down evenly. This prevents stressing the gums and reduces sensitivity, especially if your gums are already inflamed.
Pre-Remove Preparations That Save You Pain
Rinse your mouth with warm water before removal. Warm water helps relax the gums and tissues, making the aligner easier to lift without triggering discomfort. I found this worked wonders after my weekend cheat meal when my gums felt extra sensitive.
Manage Gums and Teeth Mindfully
Gently massage your gums with clean fingers to stimulate blood flow before removal. If you notice swelling, apply a cold compress for 10 minutes to reduce inflammation, making removal more comfortable and less painful.
Optimize Your Removal Timing
Remove aligners when your mouth is relaxed—preferably after meals and oral hygiene routines. Avoid rushing or removing when your mouth is tense, which amplifies discomfort. I learned to schedule removal after brushing, ensuring my gums were clean, dry, and more tolerant.
Address Persistent Sensitivity
If removal consistently causes sharp pain, consider applying a desensitizing gel 15 minutes beforehand. This provides a protective barrier and minimizes discomfort. Remember, consulting your dentist is crucial if pain persists, as it may indicate underlying issues.
Incorporate Proper Hygiene to Prevent Additional Problems
After removal, clean your aligners with a soft toothbrush and mild soap. Dirty or rough aligners can irritate sensitive gums. During my own journey, cleaning aligners thoroughly reduced irritation and helped me avoid unnecessary discomfort when taking them out.
Plan Your Next Step
Once removed, store aligners in their designated case to prevent warping and contamination, which can cause fitting issues and increase discomfort when next worn. Proper handling ensures each removal is smooth and pain-free.
Applying these targeted techniques consistently transforms the removal process from a nerve-wracking chore into a gentle routine, significantly reducing pain and enhancing your Invisalign experience. Remember, patience and proper method trump forcefulness every time, making your smile journey more pleasant and effective.
While many patients assume they understand the basics of cosmetic and general dentistry, misconceptions often persist that can hinder optimal results and even compromise oral health. Let’s dig deeper into some overlooked nuances, debunk common myths, and highlight advanced mistakes that even seasoned dental consumers can fall prey to.
People often believe that teeth whitening products are universally safe and equally effective, but the reality is more nuanced. Over-the-counter whitening kits, for example, lack the precision and professional-grade agents that a dentist uses, which can lead to uneven results or sensitivity. Moreover, many assume that whitening works equally well on all types of stains—when in fact, tetracycline stains or internal discoloration respond poorly to conventional whitening and may require alternative treatments like veneers. For the latest insights on effective whitening strategies, check out this comprehensive guide.
Invisalign users frequently overlook the importance of tracking their progress beyond just wearing aligners. A common mistake is to assume that if trays feel tight initially, they’re working perfectly, neglecting that issues like improper tracking or gaps can undermine treatment. Advanced users understand that precise control over complex movements requires frequent check-ins and sometimes refinement exercises, such as forcing stubborn trays to track correctly, as discussed here. Incorporating features like auxiliaries or attachments might seem unnecessary, but they are critical for nuanced adjustments, especially when dealing with molar rotations or root movements.
Many assume veneers are a quick fix that won’t need future attention. The truth is, improper placement or choosing low-quality resin veneers can lead to opaque looks, gum recession, or even eventual detachment. Advanced practitioners are aware that selecting porcelain veneers—browser-based techniques are available to simplify this process, as explained here—and maintaining them involves diligent oral hygiene to prevent hidden issues like decay or recession that could undermine their longevity.
Family dentistry is often misunderstood as just basic cleaning and checkups. However, integrating advanced diagnostic tools like saliva tests and understanding emerging preventive measures can drastically improve a child’s long-term oral health trajectory. Many parents neglect the importance of early interventions such as sealants or managing fluoride use, which could save them costly procedures later. For practical advice on building a resilient dental foundation for your family, read this resource.
Making these misconceptions explicit helps you avoid common pitfalls and get the most out of your dental treatments. Remember, dental innovations continually evolve, and staying informed ensures your choices are aligned with the latest standards of care. Have you ever fallen into this trap? Let me know in the comments.
How do I maintain my smile improvements over time?
Maintaining the results of treatments like whitening, Invisalign, veneers, and family dentistry requires specific tools and routines. I personally rely on high-quality ultrasonic toothbrushes, like the Philips Sonicare DiamondClean, which effectively remove plaque and prevent staining without damaging delicate veneers or enamel. Using a water flosser, such as the Waterpik Aquarius, complements brushing by reaching areas traditional flossing might miss, especially around braces or veneers, thereby helping preserve long-term health and aesthetics.
For whitening, custom lab-made trays are far superior to over-the-counter strips. I recommend investing in professional-grade trays because they ensure uniform application and reduce sensitivity—a common issue with cheap, generic kits. Regular touch-ups with a desensitizing toothpaste, like Sensodyne, further prolong results and keep discomfort at bay. As trends evolve, I predict that personalized, digitally optimized whitening strategies will become standard, allowing even more precise and safe whitening routines for patients.
Question: How do I keep my veneers looking fresh and intact?
Proper maintenance involves gentle brushing with non-abrasive toothpaste and avoiding excessive biting on hard foods. I advise using a soft-bristled toothbrush and a nano-hydroxyapatite-based toothpaste, which helps remineralize and strengthen enamel, reducing the risk of microfractures in veneers. Regular dental checkups are crucial; a recent study highlights the importance of advanced diagnostic tools like 3D digital scans to catch issues early (source). Be vigilant about gum recession or staining around your veneers, as these can indicate underlying problems. Scaling and polishing should be done professionally to prevent surface scratches that could harbor bacteria.
Scaling techniques using laser technology are another promising development, reducing treatment time while enhancing cleaning efficiency. Embracing these advanced methods can significantly extend the lifetime of your veneers. To explore cutting-edge veneer care, visit our detailed guide here.
Ideal maintenance tools for Invisalign users
Keeping Invisalign trays clear and free from bacteria is vital for both comfort and treatment progress. I use specialized cleaning crystals, like Invisalign Cleaning Crystals, which are proven to dissolve in warm water and eliminate plaque and odors effectively—something generic soaps can’t match. A dedicated interdental brush, such as the OrthoKey interdental cleaner, helps clean around attachments and in hard-to-reach areas, preventing buildup that could cause discoloration or decay.
Storing your trays properly in a ventilated case when not in use is just as important. To combat stubborn tray stains or cloudiness, I suggest periodic soaks in hydrogen peroxide mixed with water. Interestingly, recent research indicates that ozone-infused water can also sterilize trays effectively without the use of harsh chemicals (source), making hygiene routines safer and more eco-friendly. Incorporating these tools into your daily regimen will optimize your smile-straightening results and reduce oral health risks.
Next step: Incorporate digital tracking for your Invisalign progress
Utilizing app-based tracking that integrates with your dentist’s software allows real-time monitoring of tray fit and wear time. As I’ve found, these digital tools help identify issues early—saving you time, discomfort, and additional refinements. Considering the rapid advancement in dental technology, I recommend asking your provider about new innovations like AI-assisted progress analysis or 3D scanning for continuous improvement. Want to ensure your treatment stays on track? Give these advanced tools a try and see how they can revolutionize maintaining your smile’s alignment.
Throughout my journey with teeth whitening, Invisalign, veneers, and family dentistry, I’ve uncovered lessons that go far beyond the basics. These insights can dramatically transform your dental experience and long-term results. Here are some exclusive truths I wish I knew earlier that could save you time, money, and discomfort.
Surprising Lessons That Changed My Approach to Dental Care
- Skipping the little details can cause big setbacks: Ignoring signs of early sensitivity or gum irritation often leads to painful surprises later. Staying vigilant and addressing issues early keeps your smile shining and your treatments on track.
- Over-reliance on over-the-counter products can be counterproductive: Many underestimate how professional-grade treatments and tools, like custom whitening trays or advanced cleaning devices, make a real difference—saving you from ineffective or harmfully abrasive alternatives.
- Personal routines matter more than fancy gadgets: The consistent application of simple habits—like gentle brushing, flossing, and mindful aligner removal—outweighs any high-tech solution in maintaining long-term results.
- The mindsets shaping your dental long-term health: Embracing a proactive attitude, seeking regular checkups, and staying informed about new innovations empower you to protect and enhance your investment in your smile.
- Secrets professionals often keep close: Knowing when to ask about emerging technologies or advanced diagnostics—such as 3D scans or AI tracking—can give you an edge in treatment success and maintenance.
My Toolkit for Dental Confidence
- Porcelain Veneers Guide: Offers insights into the latest aesthetic options and care routines for longevity.
- Teeth Whitening Strategies: Helps tailor professional and at-home solutions for sustained brightness.
- Invisalign Advances: Keeps you updated on the latest innovations for discreet alignment.
- Family Dentistry Tips: Strengthen your foundational dental health from childhood onward, ensuring lasting results and fewer surprises.
Your Next Step Is a Confident Smile
Every smile journey is unique, and staying informed about the latest techniques and best practices makes all the difference. Don’t hesitate to embrace proactive habits, seek expert advice, and invest in quality tools. Your radiant, healthy smile is worth it!
Have you discovered a simple routine that significantly improved your dental results? Share your experience below—I’d love to hear how you’re unlocking your smile’s full potential!
Comments are closed.